![]()
This is the print version of this page. All content is copyright Indezine.com 2000-
2026.
![]()
By John Korchok
We looked at the basics of XML programming in our Introducing XML Hacking in Microsoft Office post. Now, let us take this concept further. Let’s start hacking some XML with a simple project: setting the default table text size.
This article assumes you have a suitable text editor installed. Mac users should also read the XML Hacking: Editing in OS X post.
When you insert a new table in PowerPoint, the default table text size is 18 points. Using XML hacking, we can set this to whatever point size the designer prefers. You can also set the text to appear in all caps. Following the previous post’s instructions, add .ZIP to the file ending and unzip the file. Look for the ppt folder and open it:
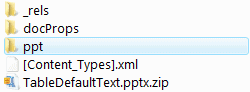
Look for the PPT folder
In the ppt folder, you will find another folder called Slide Masters. If your sample presentation is typical, it has only one Slide Master, so you won’t be surprised to find that typically Slide Masters contains only one file, called slideMaster1.xml. Open this file in your text editor and reformat the XML to make it readable:
Scroll down to near the end, looking for a tag called <p:otherStyle>. This is the section that formats default text in miscellaneous objects, like tables.

The otherStyle tag
Within the other Style section, the 4th line starts with <a:lvl1pPr. Then the 14th line begins with <a:Lvl2pPr. Each of these 10-line sections formats a different text level, with the 4th line starting the first and the 14th beginning the second level.
A handy, if terse, reference to all parameters is shown here. Not all of these are actually used in the context of a table. As one example, there are a:spcBef and a:spcAft for setting space before and after, but this is ignored by PowerPoint in a table. PowerPoint pays attention to the font size, the left margin, line spacing, alignment, and whether it’s all-caps, small caps, bold and/or italic.
The font size is set by this line: <a:defRPr sz=”1800″ kern=”1200″>.
sz=1800 is the font size in hundredths of a point, so 1800 gives us the default 18-point size. Since this is the first level that might well be used for table headings, you could set it to something like 1450 to get a 14.5 point result.
So, you could change:
<a:defRPr sz=”1800″ kern=”1200″>
To:
<a:defRPr sz=”1450″ kern=”1200″>
Since this first level can be used for headings, let’s make it all-caps while we’re at it. Edit the line to change
<a:defRPr sz=”1450″ kern=”1200″ >
To:
<a:defRPr sz=”1450″ kern=”1200″ cap=”all”>
Done!
Now proceed to the second level and set its point size.
You can change something, such as
<a:defRPr sz=”1800″ kern=”1200″>
To:
<a:defRPr sz=”1200″ kern=”1200″>
Other useful attributes for <a:defRPr> include:
In addition, spc=”400″ adds enough tracking to make 10pt text have about 1 character width between each pair. This latter parameter can be positive for wider spacing or negative to crunch text together.
Scroll down a little further: you’ll notice that there are 9 levels, though in a table you’ll probably only use the first 2 or 3. In typical Microsoft style, each level is indented further than the preceding one.
Compare level 1 with level 2:
<a:lvl1pPr marL=”0″
<a:lvl2pPr marL=”457200″
marL is the left margin. The units of measurement here are EMUs: English Metric Units. This is an invented measurement system that allows easy conversion between English and Metric units. Suffice it to say that 457200 EMUs are ½ inch. When I modify this section, I set all 9 levels to marL=”0″. I also set all lower levels to the same point size as the lowest designed level, level 2 in our example. That way, if a user keeps changing to a lower text level, the formatting remains the same.
Text alignment can also be set using the algn parameter. The useful settings are:
Of course, if you’re setting these algn values, marL should be set to 0. The simplest way to experiment with these parameters is to:
The section uses exactly the same syntax, so if you need bullets or unusual spacing in a table, you can set up to do it.
Here’s what the final file should look like, with the changes highlighted:

Final XML code
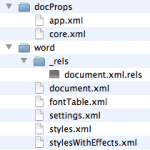
When you’re finished editing, save and close the file. In a folder window where you can see all the unzipped files, select the folders _rels, docProps and ppt, plus [Content_Types].xml:

Files to Zip
Zip them into a file that ends with the same file ending as the original presentation, usually .PPTX. Open in PowerPoint, insert a table, and test your new default font sizes. Please note, assigning these styles makes them available to the whole table, but to access them, you still need to use Increase List Level, same as in an ordinary text placeholder. Unfortunately, there’s no way to automatically assign <a:lvl1pPr> to table headings and <a:lvl2pPr> to the body of the table, which would be cool and helpful.
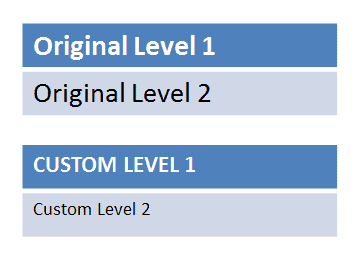
Original vs. Custom table text
You May Also Like: XML Editing in Visual Studio Express with 7-Zip

John Korchok has been creating reliable branded Office templates and web sites for more than 20 years. He is certified as a Microsoft Office Specialist Master, is an award-winning technical writer and is skilled in programming VBA, JavaScript for PDF and web, HTML, CSS, and PHP. John is a moderator for Microsoft Answers and a volunteer at Stack Overflow, providing answers for Word and PowerPoint for Windows and macOS. He currently works for Brandwares in metropolitan New York.
The views and opinions expressed in this blog post or content are those of the authors or the interviewees and do not necessarily reflect the official policy or position of any other agency, organization, employer, or company.
Filed Under:
XML
Tagged as: John Korchok, XML
Microsoft and the Office logo are trademarks or registered trademarks of Microsoft Corporation in the United States and/or other countries.
Hey!
Superuseful article, thx!
I do have one specific question though: i would like to center my text in the middle of the cell height in the table.
You explain how to align lift, right, centred or justified for the length, but not for the height.
Is this possible too?
Is there a way to put the default Table Style to “Light Style 2 – Accent 1” vs. “Medium Style 2 – Accent 1”?
This was so helpful, I have been able to set the default font size in my PowerPoint templates now.
Thank you soo much 🙂